• Menu
  • Skip to primary navigation
  • Skip to secondary navigation
  • Skip to main content

the tattooed momma logo _ black font transparent background with a capital T in the center of a circle

Wholesome recipes, homeschool resources, and tutorials for all things handmade

  • Pregnancy & Baby
    • to love being a SAHM
    • pregnancy announcement ideas
    • pregnant with pcos
    • top baby items
    • cloth diapers
    • no sew baby wrap
  • Home & Kitchen
    • Beeswax Candles
    • mayonnaise recipe
    • homemade yogurt
    • apple twist yogurt smoothie
    • sweet potato cheesecake yogurt smoothie
    • pumpkin pie yogurt smoothie
    • pumpkin banana bread
    • cast iron Q & A
    • organize board games
    • bagel recipe
  • Homeschool
    • polar bear family activity pack
    • presidents day freebies
    • corn husk dolls
    • thankful turkey
  • Pinata
    • make pinata
      • Pumpkin Pull String Pinata
      • Cocomelon Pinata
      • 4 Leaf Clover Pinata
    • decorate pinata
      • Cocomelon Pinata
      • coloring page pinata
      • modern mexican pinata
      • traditional mexican pinata
    • pinata candy hole
  • Moto
  • About
  • Youtube Videos
  • Privacy Policy
  • Pregnancy & Baby
    • to love being a SAHM
    • pregnancy announcement ideas
    • pregnant with pcos
    • top baby items
    • cloth diapers
    • no sew baby wrap
  • Home & Kitchen
    • Beeswax Candles
    • mayonnaise recipe
    • homemade yogurt
    • apple twist yogurt smoothie
    • sweet potato cheesecake yogurt smoothie
    • pumpkin pie yogurt smoothie
    • pumpkin banana bread
    • cast iron Q & A
    • organize board games
    • bagel recipe
  • Homeschool
    • polar bear family activity pack
    • presidents day freebies
    • corn husk dolls
    • thankful turkey
  • Pinata
    • make pinata
      • Pumpkin Pull String Pinata
      • Cocomelon Pinata
      • 4 Leaf Clover Pinata
    • decorate pinata
      • Cocomelon Pinata
      • coloring page pinata
      • modern mexican pinata
      • traditional mexican pinata
    • pinata candy hole
  • Moto
  • About
  • Youtube Videos

thetattooedmomma

4 Unique and Fun Ways To Announce Your Pregnancy

August 24, 2021 //  by thetattooedmomma//  4 Comments

4 Unique and Fun Ways To Announce Your Pregnancy

So you’re gonna have a baby? CONGRATULATIONS, here are 4 fun and unique ways to announce your very special pregnancy.

pregnant woman in backgroudn wearing a white long sleeve tshirt with the title fun wats to announce your pregnancy

Finding out you’re going to have a baby is one of the most magical moments a person can experience and each pregnancy is remarkable in it’s own way. For 9 months you get to help create a tiny human that will have half of your unique features and half of your loved one’s.

There’s something so soul-filling about it so why not make the announcement equally outstanding?

  • the tattooed momma youtube channel
  • Instagram
  • Mail
  • Facebook
  • Pinterest
  • TikTok

Here are 4 fun ways to announce your pregnancy

This post contains affiliate links, which means I make a small commission at no extra cost to you but I only recommend products that I actually use and love. Read the full disclosure here.

antique desk grandfather clock for a really fun way to announce your fun ways to announce pregnancy

1. Grandfather Clock – Fun Pregnancy Announcement

This one has got to be my top favorite way to announce a pregnancy because it’s so out-of-the-box thinking. You can easily Amazon deliver a grandfather clock to the grandfather to-be with an added note saying, “From your loving daughter and son in law“. It will be so much fun having them guess why in the world you randomly sent them a clock one day.

Or for added fun, hand deliver it yourself and record soon-to-be-grandpa’s reaction!

We did this to my dad for our 1st pregnancy reveal and 8 years later he still has it sitting on his dresser as a memory of that special day. He spent hours trying to figure out why in the world his daughter left a random grandfather clock on his front door steps. hahaha…classic

If I could do this one differently though I would put both clock hands pointing the number 9 just to be thorough 😉

a picture showing 2 children posing as players from Mario Kart and a picture of a stroller with pink balloons that says "new player" to announce pregnancy

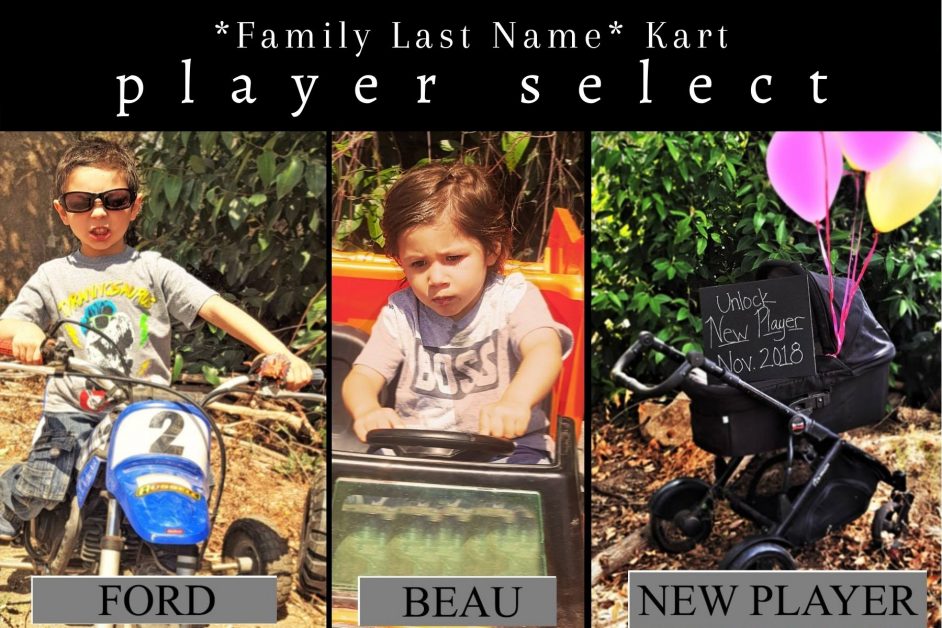
2. Mario Kart! – Fun Pregnancy Announcement

As a 90’s baby, this Mario Kart themed pregnancy announcement is so nostalgic. I know I said the first idea was my favorite but I’m starting to second guess that now because this one is pretty darn cool.

What you’ll love about this one is that it won’t just be hilarious as a first baby pregnancy announcement (dad, mom, baby) but it’s interchangeable. So siblings can be included too and you can use the idea over and over, for your first baby or for your fifth baby.

We did this one when announcing our 3rd child but looking back I really wish I had done better on the graphics. I was just too excited to announce our first baby girl so I rushed it.

Here’s a list of Mario Kart characters you can choose from to make this fun pregnancy announcement idea work for your family:

Male

Mario, Luigi, Bowser, Toad, Donkey Kong, Wario, Waluigi, Morton, Yoshi, Boo

Female

Princess Peach, Wendy, Toadette, Rosalina, Daisy,

If you want the gender to be a surprise then just say, “Mystery Player”.

  • the tattooed momma youtube channel
  • Instagram
  • Mail
  • Facebook
  • Pinterest
  • TikTok

3. A Punny Video

Make a punny video to any song that insinuates or directly says “we’re having a baby”. There are so many fun ways to announce pregnancy and the creative options are endless. Here’s a list to inspire your creativity:

  • Ice Ice Baby – Vanilla Ice
  • All American Girl – Carrie Underwood
  • Pregnant Again – Loretta Lynn
  • Baby Momma – Starrkeisha
  • Baby Shark (doo do doo do do do) – Pink Fong
  • Oops I Did it Again – Brittney Spears
  • Baby One More Time – Brittney Spears
  • One’s On The Way – Loretta Lynn

We did our 4th pregnancy announcement to the song One’s On The Way by Loretta Lynn and it was a big hit with our family and friends. If you want to see it you can check out that video here. It was a lot of work but also tons of fun and worth every bit of time put in. It’s our favorite pregnancy reveal yet and our kids ask me to play it constantly because they love seeing themselves messing up my bed, throwing rags out, and running through the house.
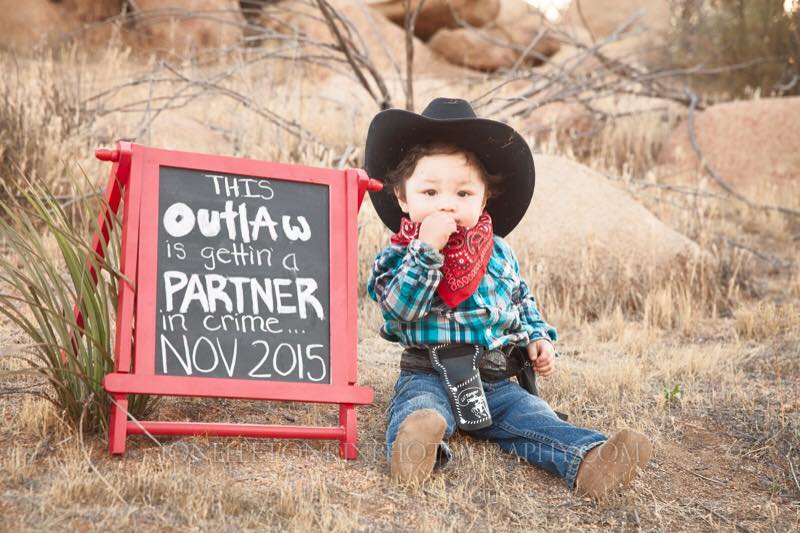
picture of a baby dressed in cowboy gear: blue flannel shirt, black cowboy hat, brown infant cowboy booties, red handkerchief, black belt, and gun holster. Next to sign that says "this outlaw is gettin' a partner in crime" for a fun a pregnancy announcement

4. Partner In Crime

Okay, I know this one isn’t THAT unique but I felt it was worth mentioning because it’s an upgrade from the “sidekick on the way” bit people usually do. Don’t get me wrong, the whole super hero thing is cute but I’d be pretty upset if I was that baby being referred to as my brother’s side kick…ya know?

So for this one choose something that is going to equalize the new baby, like —> PARTNER, buddy, pal, bestie, etc.

SHOP THIS POST

  • GRANDFATHER CLOCK
  • GO PRO 9
  • MARIO KART HOTWHEELS

Pin It!

  • the tattooed momma youtube channel
  • Instagram
  • Mail
  • Facebook
  • Pinterest
  • TikTok

You’ll also Love

first photo is the tattooed momma 33 weeks pregnant at 29 years old with her 4th baby taking a picture in front of the bathroom mirror with the title "how i got pregnant with P.C.O.S. 5 times". the bottom 4 pictures are a pink cartoon drawing of a woman's uterus, an abstract simple drawing of hormones in a random chain, the universal logo for woman, and a hormone symbol to the upper right of her. the fourth photo is the women's symbol for hormones
pinterest thumbnail for how to make your own baby carrier no sew
a 1 month old newborn baby boy being held closely by his older Choctaw brother
  • the tattooed momma youtube channel
  • Instagram
  • Mail
  • Facebook
  • Pinterest
  • TikTok

Category: BABY, motherhood, parenthood, pregnancyTag: creative ways to say im pregnant, different ways to announce im having a baby, gender reveal, grandfather clock, loretty lynn, mario kart, motherhood, ones on the way, parenthood, pregnancy announcement, pregnancy reveal, pregnancy reveal ideas, pregnant with PCOS, unique pregnancy reveal, were having a baby

How to Cloth Diaper for cheap – under $15

August 6, 2021 //  by thetattooedmomma//  4 Comments

How to Cloth Diaper for cheap – under $15

Want to start cloth diapering, but don’t want the big expense? Don’t worry, I’m gonna show you how to enter the cloth diaper world, with just $15.

white, orange, and green Econobum cloth diaper liners pictured together.

Cloth diapering is supposed to save you money but now a days getting started is so expensive!

I have found the MOST EFFECTIVE and INEXPENSIVE way to start your CLOTH DIAPER STASH and am sharing all the secrets with you here.

There is so much information out there on cloth diapering that it begins to become overwhelming and most people just end up throwing in the FLOUR SACK TOWEL (pun intended).

scroll down for video

Why You Want to Cloth Diaper

  1. Save Money
    • When first pregnant, I knew I wanted to use cloth diapers mainly because of the savings. According to countless sources, including my own, you can expect to spend anywhere from $500 – $900 on disposable diapers just in your child’s first year of life!
  1. Potty Training
    • Cloth diapers help with toilet training because they allow baby to understand when he has a dirty diaper. Disposables are designed to pull the moisture away from baby so he isn’t able to learn the difference between wet and dry.
toddler potty training on summer brand potty toilet
  1. Cloth Diapers are Better for Baby’s Skin
    • Sodium Polyacrylate is the chemical inside disposable diapers that keep them dry which is why people feel disposable diapers are better for baby’s skin. But if you change your baby’s diaper when needed, cloth diapers won’t cause a rash.
    • Most disposable diapers contain the chemical dioxin which is known to cause cancer in humans.
    • You can obviously choose a totally chemical free disposable diaper but the problem with those is back to my first point being that it will cost you a pretty penny.
    • A common question I get is “what if my baby is allergic to the cloth used in cloth diapers?”. At that point, you would just find a type of cloth that your baby isn’t allergic or sensitive to. You can change the material that sits against baby’s skin to whatever you feel is right for your child.

Cloth diaper inserts are ANY PIECE OF ABSORBENT CLOTH

picture showing the wide variety of fabrics that can be used for cloth diapering such as an old tshirt, flannel shirt, flour sack towel, a cut up blanket, and microfiber towels.

For more info on cloth diaper inserts, click the video here.

  1. (Good for Environment)
    • I have this one is parenthesis because it’s really hard to prove cloth diapering is better for the environment. Yea, you’re not throwing the diapers into the waste bin but you are having do an extra load of laundry which will then mean using more laundry soap and water. Then if you don’t line dry, you’re also using more electricity and gas to dry the diapers.
    • Most cloth diapers are made from cotton, which according to NWF.org, is a crop dependent on pesticides, even if you buy organic.
    • If you want to make sure cloth diapers are going to be better for the environment then you want to do these few things suggested by Standford Magazine.
      • (1) line dry line dry line dry. The biggest carbon footprint you’ll make when using cloth diapers is using the electric dryer so always line dry if you can.
      • (2) only wash if there are enough cloth nappies (another word for diaper) for a full load.
      • (3) reuse your cloth diapers for the next child.
      • (4) use an HE (high efficiency) washing machine.
      • (5) only wash the outer part of the cloth diaper when the lining is soiled.
Econobum cloth diapers being line dried to lessen our carbon footprint

Want to learn how to clean cloth diapers? Click here for a video guide.


How to Start Cloth Diapering under $15

After 4 years of trial and error I found the perfect cloth diaper, with an unbelievable price tag.

It’s easy to feel overwhelmed when trying to figure out what type of cloth diaper is going to work best for you. Espeically since terms like “all in one, all in twos, flats, prefolds, fitteds, pockets” and so many others are out there just slapping you in the face with more required researching. uuuuuuuuugh – No thanks bro.

Before I tell you my favorite cloth diaper cover, let me start by saying cloth diapering doesn’t have to be this cute baby trend.

We are here to save money and find an inexpensive alternative to disposables.

The 2 things you’ll need:

Since our goal for today is just to see if you even like to cloth diaper, you will only need ONE diaper cover and 1 pack of flour sack towels to get started. This should last you a full day because the covers only need to be changed if the side lining gets soiled .

Other than that, you would just wipe the inside of the diaper cover with a wipey and put it back on as if it were new.

1. Econobum Cloth Diaper Covers (also called liners or shells)

This is the material you see on the outside part that acts as a shell or protective case. They are a plastic type fabric and 100% waterproof to keep everything inside the diaper.

Econobum Diaper Covers are my go to for this because I have NEVER had a problem with leaks.

White, orange, and ribbit green Econobum cloth diapers covers displayed in a row

It’s pretty embarrassing when someone hands you back your baby because his cloth diaper didn’t do it’s job correctly and now your poor guest has a shirt wet with your child’s urine. *insert dramatic horror music*.

I was already the “weird mom” for using cloth diapers on my baby instead of getting with modern times and using good ol’ dependable disposables. So when people are already doubting your methods and then they have proof as to why your method is not gonna work, it makes it all even worse.

Lucky for me, I had my husband’s 100% support and comedic personality to always turn things around and make it go from horror to hilarious.

To get the daily inside scoop on The Tattooed Momma’s family life, follow along on Instagram

Now trust me when I say, I’ve tried a ton of different brands. Top name brands, knock off brands, even home made cloth diaper makers but all of them failed the leak test.

Econbum Diaper Covers go for $12 a piece but you also get the option to choose from their “seconds” collection which are marked down to $10 a piece – no added tax either.

Don’t be fooled by the title “seconds” because that doesn’t mean second hand. It just means there is something imperfect about the diaper so the company doesn’t feel they should be sold at full price. I have purchased most of my cloth diaper covers as “seconds” and I cannot find any differences between the full price ones and marked down ones.

Even better, they’re an all-in-one size option! They can adjust to fit like a size 1 disposable diaper, all the way to a size 4.

click one of the links below to take you directly to Econobum Cloth Diaper Covers.

Econobum Diaper Covers $12

Econobum “Seconds” Diaper Covers $10

2. Flour sack towels

The second thing you’ll need are cloth diaper inserts. This is the fabric that will be touching baby’s skin and will soak up all the urine.

As I said before, cloth diaper inserts are ANY ABSORBANT PIECE OF CLOTH.

So you can use anything from flannel, to microfiber, to cut up blankets, or even old ripped up shirts. It all just depends on what will ultimately work best for your mindset and your budget.

Now that we got that out of the way, my favorite inserts to use are plain old flour sack towels. They are my secret ingredient to making the perfect cloth diaper concoction.

wicker basket filled with flour sack towels and fresh cut french lavender from the herb garden

What makes flour sack towels so great? Lots of things!

  • they are thin enough that they dry super quick, especially if you rather line dry all your clothes.
  • they are easy to find at your local convenience store. Whenever you’re out shopping, just go to the kitchen section and there they’ll be, conveniently waiting for you to pick them up.
  • they fold into whatever shape you want them. Example: for my boys, I would just fold the towels up into a rectangle but for my girl I would fold them up to have more of the cloth towards the front.
  • cost. on top of everything else, flour sack towels are inexpensive. Depending on where you purchase them from, you’re looking at paying .75 cents to $1.25 per piece.

click one of the links below to take you directly to some flour sack towel options.

Target Flour Sack Towels $4/pk of 4

Walmart Flour Sack Towels $4.47/pk of 5

Amazon Flour Sack Towels $16/pk of 12

Click the video below to see how to fold a flour sack towel & get an up close look at the Econobum cover.

Brand new to The Tattooed Momma? Click below for my most popular posts/videos.

Make your own Baby Carrier

Turning A Closet into a Baby Nursery

Make A Pinata

How to Moby Wrap

Category: BABYTag: cloth diaper covers, cloth diaper inserts, econobum, flour sack towels, how to cloth diaper, how to save money with cloth diapers, save money with cloth diapers, start cloth diapering for cheap, why you want to cloth diaper

Easy Ways to Hide / Organize Games and Board Games

July 20, 2021 //  by thetattooedmomma//  4 Comments

Easy Ways to Hide / Organize Games and Board Games

Board games making your space feel cluttered? Don’t worry; I have 3 easy hacks that will help turn that space from messy to organized, in no time.

a before and after pic of a stack of board games being wrapped in postal packaging brown paper

The great thing about these hacks is you can switch them up whenever the design in your home changes too.

scroll down for free printable game labels

Our family loves when we have a game night. It’s a time where we can get away with being lazy but still be intentional with our time together. Since we live walking distance from a lake, we will usually bring out the board games after we’ve had a short outing to the water or if we spent the day running errands and didn’t get to do anything fun.

The Tattooed Momma's family playing the hungry hippo game

Some of my favorite childhood memories were the ones where the family gathered round for an intense game of Monopoly. Seeing everyone laugh and holler because they forgot to ask the banker for their $200 when passing go was hilarious.

Board games also do wonders to help boost your child’s math, language, and critical thinking skills.

Interested in HOMESCHOOLING? click here for a video on my favorite homeschool curriculum.

Without further ado, here are 3 ways to organize those board games!

1. BOXY BOARDGAMES

For those colorful board games, wrap them up in your preferred wrapping paper. I chose some plain brown packaging paper since the majority of our home has neutral colors. You can order the same paper here if you like the one I have.

board games wrapped in brown wrapping paper and labeled with clear sticker paper

To make the labels for the board game, I bought some clear printable sticker paper which you can find here. Then used Word to create and print them.

Click the button below to download The Tattooed Momma’s premade board game labels.

Premade Board Game Labels

I only wrapped and glued the lid for the games that had a pop off type lid.

If you don’t plan on switching out the wrapping paper I suggest gluing all sides down with a glue stick.

I didn’t glue down the paper during my first try at this method so the excess air made the lids difficult to close and caused the paper to rip easily.

2 board games getting brown paper glued down to them.

I’ll admit, gluing everything is a tedious task but so far it’s proven to be worth the time put in. Especially if your games get tossed, shoved, and smashed by little hands too excited for patience.

2. BAGGED GAMES AND/OR OVERFLOW GAMES

When I say “bagged games”, I’m specifically referring to Bananagrams or the math version of Bananagrams which would be MOBI.

the bagged games bananagrams and MOBI

I had some extra cubby boxes so I threw these games in and placed it on our game shelf.

A lot of the boxy board games had holes in the top so for these I put them in gallon zip bags and placed them inside the cubby box with the other “bagged games”.

Getting all the boxed board games to fit on one shelf was the goal. So any overflow games also got placed in the cubby box, inside zip bags.

3 pictures. one of games being put into zip bags and the others of walmarts cubby boxes

Place everything neatly inside the cubby boxes. Things that can’t be seen right away will always fall into the “out of sight, out of mind” idiom. This will later lead to clutter.

3. BOOK BOXES

Our game center doubles as a book shelf with reading material for guests so my original idea was to put all the games in book boxes or even DIY my own out of old books from the thrift store.

This would’ve required some board games to be cut into smaller pieces then taped back together to fit. I didn’t really like the idea of cutting up my small fortune of board games so I personally went with my wrapping paper method instead.

I still felt this idea was worth mentioning though because if I didn’t have cubby boxes on hand then I would have just put the smaller games into book boxes.

Another thing that made me go a different route was not being able to find the paper mache ones at my local stores. I stopped at 5 different stores and only 1 craft store had the one I wanted but that store also only had 1 on hand.

paper mache book boxes, dinosaurs, elephants, crowns, pineapple, and cactus.

If you want the book boxes, I did find out you can order them online. I just didn’t because I wanted this done that day. Here is the link for standard book boxes and for the paper mache version click here.

Brand new to The Tattooed Momma? Click below for my most popular posts/videos.

Native American Corn Husk Dolls

Turning A Closet into a Baby Nursery

Make A Pinata

Cloth Diaper for $15

Category: organize

How To Make A 4 Leaf Clover Pinata

March 16, 2021 //  by thetattooedmomma//  3 Comments

How To Make A 4 Leaf Clover Pinata

Follow along as I show you just how easy it is to make this 4 leaf clover pinata – perfect for st patricks day.

4 leaf clover shamrock pinata decorated in dark green, green, and pastel green cardstock with dark green fringe along the edges. it is sitting on a vintage oak hutch with 12 U.S. golden dollar coins sitting to the right of it.
  • the tattooed momma youtube channel
  • Instagram
  • Mail
  • Facebook
  • Pinterest
  • TikTok

You’re probably thinking “why would I make a Mexican pinata for St Patricks Day”? The answer is clear, BECAUSE YOU CAN’T HAVE A FUN PARTY WITHOUT A PINATA.

In all seriousness though I love making this lucky charm with my kids because it’s an excuse to bash something in and seeing their eyes glisten when golden dollars go flying out of the pinata is so heart warming.

I actually thought I was the only one that would ever make a 4 leaf clover pinata but I recently came across a subscriber on my Youtube channel who mentioned her friends do an Extreme Green party for St. Pattys Day and that one comment made this entire post so worth my time.

since I make piñatas specifically for my kids, I’ve included some fun St. Patrick’s Day themed coloring pages for your kiddos as an extra bonus freebie. fill out the form below to get yours.

scroll down for free downloadable pinata template or St. Patricks Day coloring pages

keep scrolling down to the bottom for free pinata template downloads

These instructions are for a 4 leaf clover pinata but the steps apply for any pinata you want to make.

INSTRUCTIONS – 4 leaf clover pianta

  1. trace & cut
    • trace 2 identical 4 leaf clovers (one for the front and one for the back of the pinata) onto cardboard then cut them out with a box cutter or xacto knife. You can use scissors but it will be more difficult. (free download for 4 leaf clover piñata is located at end of post)

The best cardboard to use for piñatas are the Costco carboard sheets because they’re the perfect thickness/thiness. They are usually stuffed in between the steel cages or within layers of product but if you can’t find any, just ask an employee for a SLIP SHEET – they’ll know what you mean.

Any cardboard will work though. For this 4 leaf clover pinata, I’m using the packaging box from my daughter’s Disney Frozen table.

cutting out a 4 leaf clover shape using a box cutter
  1. sides
    • with the leftover cardboard, cut out a bunch of 4″ wide strips – these will be the sides. The length doesn’t matter, but be sure to cut against the corrugation.
a pile of 4" wide cardboard strips
dotted line going across a piece of cardboard
  1. assemble
    • using masking tape, start attaching the 4″ cardboard strips to one of the 4 leaf clover cut outs. Do this until you have gone all the way around.

DO NOT ATTACH THE OTHER 4 LEAF CLOVER CUT OUT YET.

1 piece of masking tape being attached to 4 leaf clover pinata template
4 leaf clover pinata being assembled using masking tape and cardboard
4 leaf clover pinata with bottom and sides assembled
  1. attaching the rope + rope cardboard piece
    • staple a leftover 4″ side cardboard piece where you want the rope to be (this will give the pinata some extra strength when the candy is added)
    • poke 2 holes wherever you want the rope to be
    • loop it through the holes then tie a knot at each end to secure it in place
    • give it a good tug to make certain it’s secure
placing an extra piece of cardboard where the handle for the 4 leaf clover pinata will go
poking 2 holes for the 4 leaf clover pinata rope to loop through
half finished 4 leaf clover pinata with handle attached
  1. toughening up the pinata
    • This step is optional but I highly recommend doing it. It’s extra work but well worth it in the end.
    • Fold one of your 4″ strips to resemble a toilet paper roll and glue it in the center of your pinata.

If you made a larger pinata then add a few more pieces but spaced apart. The more you add the tougher the pinata will be.

toilet paper roll
toilet paper roll glued to center of the 4 leaf clover pinata
  1. attach the other side
    • attach the other 4 leaf clover pinata cut out using masking tape.
masking tape being use to hold together a shamrock pinata
  1. reinforce
    • To make sure all parts of the pinata stay in place, tape long pieces of masking tape around the entire pinata. Use the same motion as if you were winding up a ball of yarn.

I used blue painters tape here for a better visual but I don’t recommend using painters tape because it does not stick well.

blue painters tape wrapped around 4 leaf clover pinata

SHOP THIS POST

  • BOX CUTTER
  • PRECISION KNIFE (comparable to xacto knife)
  • PINATA ROPE
  • MASKING TAPE
  • STAPLER
  • TISSUE PAPER MULTI COLORS
  • TISSUE PAPER MULTI COLORED WITH GOLD & SILVER
  • SCISSORS
  1. decorate
    • click one of the tutorials below
pinata decorated with white buther paper and outlined with black paint to look like a coloring page
Traditional Mexican Pinata made using green fringed crepe paper
st patricks day pinata decorated with dark and light green card stock

Let’s Connect!

  • the tattooed momma youtube channel
  • Instagram
  • Mail
  • Facebook
  • Pinterest
  • TikTok

Pin It: 4 leaf clover stuffs

4 leaf clover pinata turtorial pinterest pin

YOU’LL ALSO LOVE

number 2 cocomelon inspired pinata and a boy cocomelon logo pinata
Cocomelon Pinata Tutorial
How to cut the Piñata Candy Hole
Pull String Pinata Tutorial

This post contains affiliate links, which means I make a small commission at no extra cost to you but I only recommend products that I actually use and love. Read the full disclosure here.

  • the tattooed momma youtube channel
  • Instagram
  • Mail
  • Facebook
  • Pinterest
  • TikTok

Category: DIY's, holiday, Pinata, st patricks dayTag: 4 leaf clover, birthday party, birthday party games, birthday party games for kids, cheap party ideas, diy pinata, extreme green, how to decorate a pinata, how to make a pinata, pinata, saint patrick, shamrock, st patricks day, st patricks day activities, st patricks day crafts, st pattys day, strong pinata, the tattooed momma, tough pinata

How to Decorate A Modern Mexican Pinata

March 11, 2021 //  by thetattooedmomma//  Leave a Comment

Combining traditional and new techniques to create a Modern Mexican Pinata.

st patricks day pinata decorated with dark and light green card stock

Modern Mexican Pinata Instructions

These instructions are for how to DECORATE a pinata. If you need instructions on how to make a pinata, click here.

These instructions are specific for making a shamrock pinata but the process is the same for any shape pinata you want. Just change the colors and shapes you use.

scroll down for the printable How To

Step 1. Prep the Fringe

  • cutting fringe into green crepe paper to decorate a traditional mexican pinata
  • cutting lots of strips of crepe paper for traditional mexican pinata

Using the same process as you would if making a Traditional Mexican Pinata, cut lots and lots of long strips of green crepe paper (AKA party streamer). You can use tissue paper also, just make sure to cut 4″ strips first then continue to the next step.

The length does not matter because you will trim the excess later.

Cut slits across the crepe paper about a finger width apart and 3/4’s of the way up.

Step 2. Glue Mixture

school glue mixed with water in a small clear bowl

Mix 1 cup school glue with water until it is as thin as paint.

Step 3. Decorate the Back

Starting at the base of the pinata, paint a strip of glue from the left aaaaall the way across to the right.

Attach your first piece of pre cut fringe crepe paper to that line of glue.

Repeat these steps until you’ve made your way to the top of the pinata.

Trim the edges and glue them down onto the sides of the pinata. When we decorate the side, the excess will be hidden.

Step 4. Prep the Front

  • black tissue paper glued onto a 4 leaf clover shaped pinata
  • green tissue paper glued onto cardboard for a modern mexican pinata look

Glue white or black tissue paper to the front of the pinata until it’s all covered.

This will be our base to make sure none of the raw parts of the pinata show through.

Now glue dark green tissue paper until all of your base tissue paper is covered. Don’t put glue in the center of the pinata – only use glue around the edges for this step.

Step 5. Cardstock for a Modern Mexican Pinata Look

  • 4 leaf clover template for modern mexican pinata
  • cardstock being added to modern mexian pinata
  • light green cardstock being glued onto dark green cardstock

Using a slightly lighter green cardstock than your tissue paper, trace and cut out a clover shape then glue it on.

click below for the free printable for this piece. To save paper, both sizes are on it – within eachother. Cut the large piece out first then the smaller piece when doing the next step.

4 Leaf Clover Embellishment PiecesDownload

Using another shade of green cardstock, trace and cut out a clover shape then glue it on top of our previous clover.

Step 6. Decorate the Sides

This time, you can start anywhere along the side of the pinata then paint a strip of glue from the left side to the right side.

Attach your first piece of pre-cut fringed crepe paper to that line of glue.

Repeat these steps until you’ve made your way all the way around then trim the excess with scissors and you’re done!

st patricks day pinata decorated with dark and light green card stock

Like the Modern Mexican Pinata but want something less time consuming?

Click one of the free tutorials below. Both come with a free printable how-to and video instructions.

  • pinata decorated with white buther paper and outlined with black paint to look like a coloring page
    https://thetattooedmomma.com/coloring-page-pinata/
  • Traditional Mexican Pinata made using green fringed crepe paper
    https://thetattooedmomma.com/traditional-mexican-pinata/
Yield: 1

Modern Mexican Pinata

4 leaf clover pinata decorated using green tissue paper and different shades of green cardstock

Step by step instructions for a traditional looking pinata with a cute modern twist.

Prep Time 20 minutes
Active Time 40 minutes
Total Time 1 hour

Materials

  • green crepe paper or tissue paper
  • green tissue paper
  • 2 pages of green cardstock
  • 2 pages of light green cardstock
  • glue
  • optional: white or black tissue paper for base. (you can use green tissue paper if you have enough to spare)

Tools

  • scissors

Instructions

Step 1. Prep the Fringe

cut lots and lots of long strips of green crepe paper (AKA party streamer). You can use tissue paper also, justmake sure to cut 4" strips first then continue to the next step.

Cut slits across the crepe paper about a finger width apart and 3/4's of the way up.

Step 2. Glue Mixture

Mix 1 cup school glue with water until it is as thin as paint.

Step 3. Decorate the Back

Starting at the base of the pinata, paint a strip of glue from the left aaaaall the way across to the right.

Attach your first piece of pre cut fringe crepe paper to that line of glue.

Repeat these steps until you've made your way to the top of the pinata.

Trim the edges and glue them down onto the sides of the pinata. When we decorate the side, the excess will be hidden.

Step 4. Prep the Front

Glue white or black tissue paper to the front of the pinata until it's all covered.

Now glue dark green tissue paper until all of your base tissue paper is covered. Don't put glue in the center of the pinata - only use glue around the edges for this step.

Step 5. Cardstock

Using a slightly lighter green cardstock, trace and cut out a clover shape then glue it on.

Using another shade of green cardstock, trace and cut out a clover shape then glue it on top of our previous clover.

Step 6. Decorate the Sides

This time, you can start anywhere along the side of the pinata then paint a strip of glue from the left side to the right side.

Attach your first piece of pre-cut fringed crepe paper to that line of glue.

Repeat these steps until you've made your all the way around then trim the excess with scissors and you're done!


© thetattooedmomma
Project Type: pinata / Category: DIY's

Category: Pinata

How To Decorate A Traditional Mexican Pinata

March 11, 2021 //  by thetattooedmomma//  1 Comment

Step by Step instructions to make a traditional Mexican Pinata with free Printable How To and video tutorial.

Traditional Mexican Pinata made using green fringed crepe paper

Tradiontal Mexican Pinata Instructions

These instructions are for how to DECORATE a pinata. If you need instructions on how to make a pinata, click here.

scroll down for the printable How To

Step 1. The Traditional Mexican Pinata Fringe Decor

  • cutting fringe into green crepe paper to decorate a traditional mexican pinata
  • cutting lots of strips of crepe paper for traditional mexican pinata

Cut lots and lots of long strips of green crepe paper (AKA party streamer). You can use tissue paper also, just make sure to cut 4″ strips first then continue to the next step.

The length does not matter because you will trim the excess later.

Cut slits across the crepe paper about a finger width apart and 3/4’s of the way up.

Step 2. Glue

school glue mixed with water in a small clear bowl

Mix 1 cup school glue with water until it is as thin as paint.

Step 3. Decorate the Front and Back

Starting at the base of the pinata, paint a strip of glue from the left aaaaall the way across to the right.

Attach your first piece of pre cut fringe crepe paper to that line of glue.

Repeat these steps until you’ve made your way to the top of the pinata then do the same for the back side.

Trim the edges and glue them down onto the sides of the pinata. When we decorate the side, the excess from the front and back will be hidden.

Step 4. Decorate the Sides

This time, you can start anywhere along the side of the pinata then paint a strip of glue from the left side to the right side.

Attach your first piece of pre-cut fringed crepe paper to that line of glue.

Repeat these steps until you’ve made your all the way around and back to the starting point.

After you’ve glued fringe on all 3 sides, trim the excess with scissors and you’re done!

traditional mexican pinata all decorated with fringed crepe paper

Like the Traditional Mexican Pinata but want something more eye catching or unique?

Click one of the free tutorials below. Both come with a free printable how-to and video instructions.

  • pinata decorated with white buther paper and outlined with black paint to look like a coloring page
    https://thetattooedmomma.com/coloring-page-pinata/
  • st patricks day pinata decorated with dark and light green card stock
    https://thetattooedmomma.com/modern-mexican-pinata/
Yield: 1

Traditional Mexican Pinata

traditional mexican pinata all decorated with fringed crepe paper

Step by Step instructions to decorate a traditional Mexican Pinata.

Prep Time 10 minutes
Active Time 30 minutes
Total Time 40 minutes

Materials

  • Crepe Paper or Tissue Paper
  • Glue

Tools

  • Scissors

Instructions

Step 1. Prep the Crepe Paper

Cut lots and lots of long strips of green crepe paper. The
length does not matter because you will trim the excess later.

Cut slits across the crepe paper about a finger width apart and 3/4's of the way
up.

Step 2. Mix the Glue

Mix 1 cup school glue with water until it is as thin as paint.

Step 3. Decorate Front and Back

Starting at the base of the pinata, paint a strip of glue from the left aaaaall the way across to the right.

Attach your first piece of pre cut fringe crepe paper to that line of glue.

Repeat these steps until you've made your way to the top of the pinata then do the same for the back side.

Trim the edges and glue them down onto the sides of the pinata.

Step 4. Decorate the Sides

This time, you can start anywhere along the side of the pinata. Paint a strip of
glue from the left side to the right side.

Attach your first piece of pre-cut fringed crepe paper to that line of glue.

Repeat these steps until you've made your all the way around and back to the starting point.
After you've glued fringe on all 3 sides, trim the excess with scissors and you're
done!


© thetattooedmomma
Project Type: pinata / Category: DIY's

Category: PinataTag: crepe paper, traditional mexican pinata

Coloring Page Pinata – How To Decorate

March 10, 2021 //  by thetattooedmomma//  Leave a Comment

How To Decorate A Coloring Page Pinata

Easy coloring page pinata for when you want to make a pinata but don’t want all the extra decoration work.

pinata covered with white butcher paper

These instructions are how to DECORATE a pinata. If you need instructions on how to MAKE A PINATA CLICK HERE.

showing the supplies you need to make a pinata

Scroll to the bottom for printable instructions

After making my 9th or 10th pinata, I really grew tired of the long tedious process of it all. Don’t get me wrong, I enjoy making them for my kids’ birthdays or family events or even for friends that request them but after a while it becomes more of a job than a fun DIY.

various examples of different pinata designs from the tattooed momma

One day I was feeling a little burnt out so my sweet oldest child was attempting to help anyway he could. While I was working on a Ninja turtle pinata for a friend, he says to me, “Could you print me a coloring page ninja turtle so I can show you what colors you need for that?”. I thought it was the sweetest thing that he wanted to help his tired mom.

As he started coloring his coloring page, I began thinking of ways I could let him help. What could it hurt? I was looking for a quicker way at this whole thing anyway. Maybe I could just take some extra time and really show him because it’s not like it’s hard to glue pieces of crepe paper down. But not today, I needed to finish this thing by morning.

Then it hit me!!!!

COLORING……………….PAGE………………PINATA!

painting a black outline with acrylic paint onto white butcher paper to make it look like a coloring page pinata

So I went to work. I already finished one side as I normally would so all that was left was to create a coloring page on the back side. And you know what, the little girl and my friend loved it. It served as a party activity for her guests and occupied the little ones while the mom finished up with her own party decorating. Win win. Happy customer and I saved an awful lot of time.

Want to know when the next FREE pinata TEMPLATE will be out? Follow me on Youtube for updates.
pictures showing what you can learn from the tattooed momma

The only materials you’ll need for this method are white paper, preferably butcher paper, and black paint. You are able to substitute the paint for a thick black marker but the paint makes doing the border a cinch.

NOW, HOW DO YOU MAKE YOUR OWN COLORING PAGE PINATA?

keep scrolling for the printable how to

  1. White Butcher Paper. Put glue around the edges of the front side of your pinata but do not put glue in the center because it will leave creases in the final product. Once you’ve glued 2 layers of white butcher paper down, repeat this process for the back side.
    • NOTE: 2 layers is usually enough to hide the raw parts of the pinata, but you can add as many layers as you feel are needed.
white butcher paper being glued down to a pinata frame to create a coloring page pinata
  1. Trim. Cut the extra butcher paper off, leaving about about 2″-3″ of excess then glue down the left overs to the sides of the pinata.
  1. Pinata Sides. Cut 4″ strips of butcher paper and glue them to the side of your pinata. Add 2 layers of butcher paper so the raw parts of the pinata dont show through.
    • NOTE: When you get to the rope, cut a slit in the tissue paper and pull the rope though.
step 3 for coloring page pinata
  1. Finishing Touches. Trace around the entire edge of your pinata using black acrylic paint.
    • NOTE: Alternatively, you can use a thick black marker or any black paint if you don’t have black acrylic paint. I just prefer acrylic paint because it dries quickly and glides on easy.
painting a black outline with acrylic paint onto white butcher paper to make it look like a coloring page pinata
  1. Finally, let your child do the rest of the decorating by coloring it in with either paint or markers.
  • pinata covered with white butcher paper

Need more help? Click the video below.

Yield: 1

Coloring Page Pinata

pinata covered with white butcher paper

Easy coloring page pinata for when you want to make a pinata but don't want all the extra work.

Prep Time 10 minutes
Active Time 20 minutes
Total Time 30 minutes

Materials

  • White Butcher Paper
  • Black Acrylic Paint (or black marker)
  • Glue

Tools

  • Scissors

Instructions

    Step 1. White Butcher Paper

Put glue all around the edges of the front side of your pinata. Do not put glue in the center or it will leave creases in the final product.

Glue 2 layers of white butcher paper then repeat this process for the back side.

2 layers is usually enough to hide the raw parts of the pinata, but add a 3rd layer of white butcher paper if needed.

Step 2. Trim

Cut the extra butcher paper off, leaving about about 2"-3" of excess. Then glue down the left over butcher paper to the sides of the pinata.

Step 3. Sides

Cut 4" strips of butcher paper and glue them to the side of your pinata.

When you get to the rope, cut a slitin the tissue paper and pull the rope though.

Add 2 layers of butcher paper so the raw parts of the pinata dont show through.

Step 4. Finishing Touches

Trace around the entire edge of your pinata using black acrylic paint or a thick black marker.

Step 5.

Let your child do the rest of the decorating with either paint or markers, like a coloring page,


© thetattooedmomma
Project Type: pinata / Category: DIY's

Looking for more pinata tutorials? Click below for more pinata fun!

Make A Tough Pinata

Decorate A Modern Mexican Pinata

Pinata Traditional Mexican Way

Make A Shamrock Pinata

Consider following me on Instagram.

Category: CREATE, PinataTag: coloring page pinata, how to decorate a pinata, how to make a pinata

Easy Valentine’s Day Bagels

February 13, 2021 //  by thetattooedmomma//  4 Comments

Easy Valentine’s Day Bagels

Showing just how easy it is to make your own delicious bagels at home and with a step by step guide on how to shape each one into a cute heart, perfect for your loved ones.

7 sourdough heart shaped bagels laying on dark wooden cutting board

This post contains affiliate links, which means I make a small commission at no extra cost to you but I only recommend products that I actually use and love. Read the full disclosure here.

Even if you’ve never made bagels before, you’ll soon be a bagel expert because I’m gonna show you everything I know!

scroll to bottom for printable recipe

My kids especially love when there are home made bagels cooking because it almost always means we’ll be backroading or off-roading in our old pick-up truck to have a picnic in the hills.

3 kids and dad having a bagel sandwich picnic in the hills

Our favorite thing to do with bagel bread is use them to make sandwiches since the everything bagel seasoning gives the sandwich such delicious flavor.

And to make them even more special, every now and then, I’ll shape them into little hearts just to remind my family that I love them ;).

It took a few trial and errors before getting them to keep their cute heart shape because they like to fatten up in the boiling water but my pain is your gain!

Let’s Connect!

the tattooed momma instagram link
large blue letter T with black circle around it
The Tattooed Momma

I’m gonna show you exactly how to get it right, and if you don’t, I show you how to fix it to make it still look like they’re perfect.

scroll down for printable version

INSTRUCTIONS – valentine’s day heart bagels

1. THE NIGHT BEFORE – prep the dough
  • add sourdough starter, water, maple syrup, salt, and 2 cups flour to a stand mixer. (you can mix by hand if you don’t have a mixer).
  • set your mixer to low speed and let the dough mix for 7-10 minutes until it’s all incorporated together.
  • switch to a dough hook and add your remaining 2 cups of flour, only adding a 1/2 a cup of flour at a time.
  • mix until most of the dry spots are gone
  • roll the dough into a ball, place in a bowl, and cover it.
  • let rest overnight or at least 4 hours.
bagel dough after resting overnight, sitting on top of wooden cutting board
bagel dough after resting overnight
2. THE NEXT DAY – shape your heart bagels
  • divide dough into 10 equal pieces
  • shape your bagels using either a heart shaped cookie cutter or form your hands into a heart shape while squeezing a ball of bagel dough into your heart shaped hands. (see video for visual description).
  • poke a hole in the center of your bagel using your finger or a straw.
  • stretch the hole until it is about a nickel to a quarter size wide.
  • cover shaped bagels with a kitchen towel and let rest 1-3 hours. (if you don’t want to wait, you can move on to the next step but the longer you wait the fluffier they’ll be.)
8 uncooked bagels, 1 shaped in a valentines day heart, 7 round shaped bagels on white parchment paper
shape your bagels
3. BOIL
  • bring a pot of water to a boil and preheat oven to 425 degrees while you finish this step.
  • add 1 tablespoon brown sugar (or your sweetener of choice) to the boiling water then a little bit at a time, add 1 tablespoon baking soda
  • add a few bagels to your pot BUT DON’T CROWD THE BAGELS. leave enough room for each to puff out a bit more.
  • line your baking dish with parchment paper (or foil).
  • after 1-3 minutes, flip them so the other side boils in the baking soda/sugar water. (the time you leave them in the water is entirely up to you because the longer they boil, the puffier they get.)
  • once the bagels have reached your puffy preference, place them on your baking sheet that you’ve lined with parchment paper.
  • continue steps 4-7 until all your bagels have been boiled.
  • (optional) reshape your bagels if they got a bit wonky in the boiling water
  • (optional) add bagel toppings.
raw bagels being placed in a boiled water mixture of 1 tablespoon sugar + 1 tablespoon baking soda
boil the bagels
4. BAKE
  • place your boiled bagels in your 425 degree preheated oven for 20 minutes or until SLIGHTY GOLDEN.
  • Now, let them rest on your counter for 10 minutes to finish cooking on the inside.
slightly golden heart shaped food bagels
5. SLICE & EAT!

Valentine’s Day Heart Bagel Video Tutorial

SHOP THIS POST

  • big baking sheet
  • everything bagel seasoning

YOU’LL ALSO LOVE

homemade yogurt smoothie in a mason jar embellished with a quartered red yellow pink lady apple and a fresh cinnamon stick
how to make a strong pinata
sourdough starter pumpkin banana bread in a clear loaf pan sitting on top of a wooden hutch counter top
Yield: 10 bagels

Easy Valentine's Day Bagels

7 heart shaped baked bagels with a slightly golden crust sitting on top of a cookie tray lined with parchment paper

Heart shaped sourdough bagel recipe. see Youtube video for visuals.

Prep Time 20 minutes
Cook Time 30 minutes
Additional Time 8 hours
Total Time 8 hours 50 minutes

Ingredients

Bagel Dough Ingredients

  • 1/2 cup sour dough starter (or 1/2 packet of active dry yeast mixed with 1/2 cup of water)
  • 1 cup water
  • 3 tablespoons maple syrup (or your sweetener of choice)
  • 2 teaspoons salt
  • 2 cups all purpose flour
  • 2 more cups all purpose flour (set aside)

Boiled Water Ingredients

  • 1 tablespoon baking soda
  • 1 tablespoon brown sugar (or your sweetener of choice)

Instructions

THE NIGHT BEFORE - prep your dough

  1. add sourdough starter, water, maple syrup, salt, and 2 cups flour to a stand mixer. (you can mix by hand if you don't have a mixer).
  2. set your mixer to low speed and let the dough mix for 7-10 minutes until it's all incorporated together.
  3. switch to a dough hook.
  4. adding 1/2 a cup at a time, add your remaining 2 cups of flour. (1/2cup, mix it in. 1/2cup, mix it in. 1/2 cup, mix it in. 1/2 cup, mix it in.)
  5. mix until most of the dry spots are gone
  6. roll the dough into a ball
  7. place in a bowl and cover it.
  8. let rest overnight or at least 4 hours.

THE NEXT DAY - shape the bagels

  1. divide dough into 10 equal pieces
  2. shape your bagels using either a heart shaped cookie cutter or form your hands into a heart shape while squeezing a ball of bagel dough into your heart shaped hands. (see video for visual description).
  3. poke a hole in the center of your bagel using your finger or a straw.
  4. stretch the hole until it is about a nickel to a quarter size wide.
  5. cover shaped bagels with a kitchen towel and let rest 1-3 hours. (if you don't want to wait, you can move on to the next step but the longer you wait the fluffier they'll be.)

BOIL THE WATER

  1. bring a pot of water to a boil and preheat oven to 425 degrees.
  2. add 1 tablespoon brown sugar (or your sweetener of choice)
  3. a little bit at a time, add 1 tablespoon baking soda
  4. add a few bagels to your pot BUT DON'T CROWD THE BAGELS. leave enough room for each to puff out a bit more.
  5. line your baking dish with parchment paper (or foil).
  6. after 1-3 minutes, flip them so the other side boils in the baking soda/sugar water. (the time you leave them in the water is entirely up to you. The longer they boil, the puffier they get.)
  7. once the bagels have reached your puffy preference, place them on your baking sheet that you've lined with parchment paper.
  8. continue steps 4-7 until all your bagels have been boiled.
  9. (optional) reshape your bagels if they got a bit wonky in the boiling water
  10. (optional) add your bagel toppings.

BAKE

  1. place your boiled bagels in your 425 degree preheated oven for 20 minutes or until SLIGHTY GOLDEN. (see youtube video for visual)
  2. let them rest on your counter for 10 minutes to finish cooking on the inside.

SLICE & EAT!

Notes

UNDERCOOKED

if your bagels are undercooked, this is mostly likely because the hole needed to be bigger to allow for even cooking. WE CAN FIX THIS! slice your bagels and place them in your toaster before eating.

UGLY BAGELS

add bagels toppings to hide mistakes. 😉

Cuisine: bagel / Category: sourdough

Category: holiday, sourdough, valentines dayTag: Bagels, From scratch food, Heart shaped food, Sourdough, Valentines day food

Quick Baby Carrier DIY – no sew

January 28, 2021 //  by thetattooedmomma//  6 Comments

Quick Baby Carrier DIY – no sew

An easy and quick DIY baby carrier wrap – no sew. And it’s just as good as those pricey name brands.

tattooed mom holding infant girl in a blue hand made knit baby carrier - no sew

This post contains affiliate links, which means I make a small commission at no extra cost to you but I only recommend products that I actually use and love. Read the full disclosure here.

If you’ve never sewed before, don’t worry because this DIY only requires scissors, measuring tape, and some stretchy fabric.

Scroll to the bottom for printable instructions

When our 3rd baby arrived I couldn’t get away with just setting her down to play while I did the daily chores since her 2 toddler bothers, I mean brothers, would get too excited and innocently frustrate her all day long. This led to me constantly tending to a fussy baby.

mom displaying how short a 20" hand made baby carrier isn't tall enough to cover baby's head

So I decided to purchase one of those fancy Moby wraps I had seen all the moms sporting but I didn’t like the patterns OR THE PRICE!

Were they really worth that much?

Lucky for me (and you), my aunt had just bought herself a Solly Wrap so I was able to get a closer look at just how “special” these things were.

I soon realized,they are all just ONE GIANT LOooooooooNG PIECE OF FABRIC!

The Tattooed Momma cutting blue fabric in half to baby a no sew baby carrier.

It’s also worth noting, you can make these for $2! No, that’s not a typo, it’s $6 total but comes out to be $2 DOLLARS A WRAP – and it’s way easy! If you know how to use a pair of scissors, you can do this.

I know what you’re thinking, this all sounds too good to be true and it’s not gonna hold up or will be super uncomfortable…but no – it’s perfect!

I used mine through Prim’s first year and it is still like new just waiting for the opportunity to snuggle the next infant.

Let’s Connect!

the tattooed momma instagram link
large blue letter T with black circle around it
The Tattooed Momma

The wrap is essentially just a cross back baby carrier so it distributes the weight of the baby evenly. It was very lightweight on my back and the most comfortable baby carrier I’ve used so far.

Now to the good stuff – HOW DO YOU MAKE YOUR OWN BABY CARRIER WRAP?

  1. Get 6 yards of any knit fabric.
    • Note – Knit fabric is just fancy sewing talk for stretchy fabric. (I got mine for a dollar per yard at Walmart.)
  1. Figure out how TALL you want it. This is the part that covers the baby from head to toe so choose any height between 20″ and 30″.
    • So you get an idea, the black/white wrap on the left is 20″ tall and the blue wrap on the right is 30″ tall.
    • NOTE: most wraps range b/w 20″ to 30″ wide by 5 & 1/2 yards to 7 yards long.
tattooed mom holding infant girl in a blue hand made knit baby wrap
  1. Cut your fabric at however tall you have chosen (20″-30″).
    • NOTE: you won’t have to do any cutting for the LENGTH. The length will always be the original 6 yards you started with.
The Tattooed Momma measures width of double sided stretchy knit fabric with blue measuring tape
  1. And you’re DONE!
    • NOTE: you will now have 2 or 3 wraps.

Need more help? Check out the video below.

SHOP THIS POST

  • FABRIC SCISSORS

YOU’LL ALSO LOVE

How To Tie A Moby Wrap

Top Best Baby Items

Turning A Closet into a Baby Nursery

How to Cloth Diaper

Yield: 2-3 wraps

Easy DIY Baby Wrap Carrier

The Tattooed Momma using DIY baby wrap to carry infant

DIY Baby Wrap Carrier. Easily replicate those expensive name brand baby wraps.

Prep Time 10 minutes
Active Time 10 minutes
Total Time 20 minutes
Difficulty Easy
Estimated Cost 6

Materials

  • •6 yards knit (stretchy) fabric

Tools

  • •Fabric Scissors or Rotary Cutter
  • •Measuring Tape

Instructions

    1. 1. Purchase 6 yards of ANY KNIT FABRIC (aka stretchy fabric)
    2. 2. Figure out how WIDE you want your wrap to be. Choose
      between 20" to 30"
    3. 3. Cut your fabric at the WIDTH you have chosen.
    4. 4. ALL DONE! wasn't that EASY?

Notes

view below for more detailed instructions

➡DETAILED INSTRUCTIONS
1.Purchase 6 yards of ANY KNIT FABRIC (knit fabric just
means STRETCHY fabric

2. Figure out how WIDE you want your wrap to be. Choose
between 20 inches to 30 inches. This is how tall your wrap will be and
what covers the baby from head to toe. NOTE: most wraps range b/w 20 inches to 30 inches wide. and range between 5 & 1/2 yards to 7 yards long

3. Cut your fabric at the WIDTH you have chosen. (20", 21", 22", 23", 24", 25" ,26", 27", 28", 29", or 30") NOTE: you won't have to do any cutting for the LENGTH. The length will still be the original 6 yards you started with. All you are doing is making your original 6 yard long piece of fabric into MORE 6 yard long pieces

4. ALL DONE! wasn't that EASY? NOTE: At this point you should have either 2 or 3wraps, depending on how wide your fabric was to begin with and depending on how wide you chose to make them.

If you don't already have a good pair of fabric scissors, it is definitely worth investing in a pair for this project. It makes things easier and quicker. I used a regular pair of scissors on my first wrap. Once I upgraded to fabric scissors though, I wished I had done it sooner.

If you want to lessen the bulk of your wrap, taper it on both sides. To Taper: make or become gradually smaller toward one end.

I did this with the double sided knit fabric (that I bought at Walmart) because the knot ended up being too bulky. My goal was to have a warmer blanket like wrap during the winter months. Tapering the ends made it possible to have a warm wrap without it looking like I made it myself, if you catch my drift.

WINTER WRAP - if you want a warmer baby wrap, choose a warmer or thicker knit. Examples of warmer/thicker knits: sweat pant or sweat shirt type fabric.

SUMMER WRAP - if you want a wrap that will allow you and the baby to stay cool while being so close, chose a lighter/thinner knit. Examples of lighter/thinner knits: yoga pants material or tank top material.

Category: CREATE

Category: BABY, CREATETag: how to diy a moby wrap, how to make my own baby wrap, how to wrap a baby, no sew DIY moby wrap, no sew easy baby carrier how to

  • « Go to Previous Page
  • Page 1
  • Page 2
  • Page 3
  • Privacy Policy

Copyright © 2025 · Mai Lifestyle Pro on Genesis Framework · WordPress · Log in