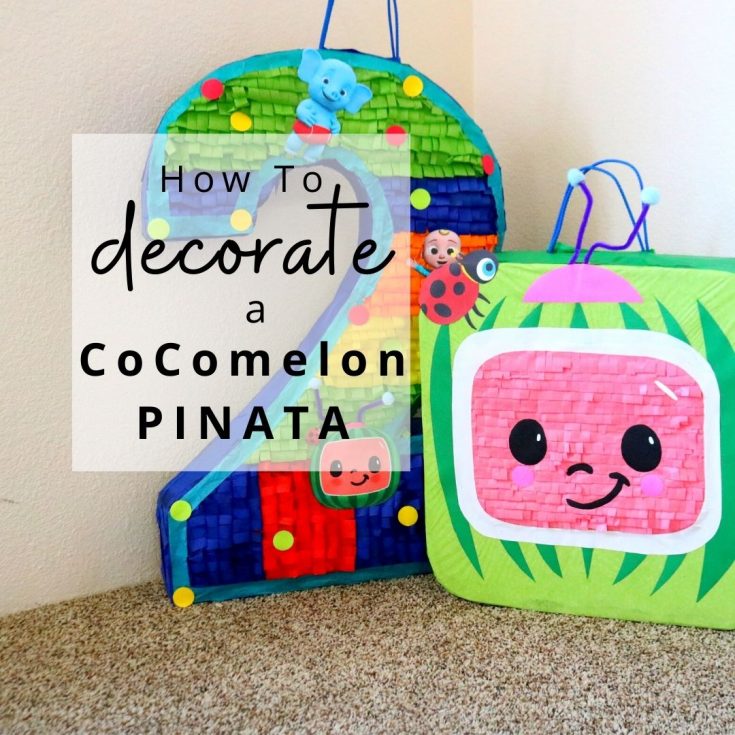
How To Decorate A Cocomelon Pinata
Step by step instructions to DECORATE a beautiful Cocomelon TV Pinata.

Decorating a pinata is something the whole family can enjoy doing together. Since you’ll be bashing it open within a few hits, you don’t need to worry about every detail being perfect because, really – nobody cares.
But if you are making pinatas for your business or you’re just a perfectionist then this tutorial is right up your alley.
I’m going to give you every single tiny detail on how to decorate a beautiful Cocomelon pinata that everyone will love looking at.
Don’t be shocked if your guests have a hard time wanting to break it apart because it’s so pretty.

These instructions are how to DECROATE a cocomelon tv pinata. If you want to learn how to MAKE it then click link at the bottom of this blog post.
Click the video below for a step by step video guide to make & decorate a cocomelon pinata.
or keep scrolling for the printable version
SCROLL DOWN FOR PRINTABLE HOW TO
SUPPLIES TO DECORATE cocomelon pinata
- school glue
- lime green, dark green, and pink tissue paper
- 2 purple pipe cleaners (or purple cardstock)
- 2 small sky blue pom poms (or sky blue cardstock)
- cardstock: black, white, pink, and dark green
How to DECORATE Cocomelon Pinata
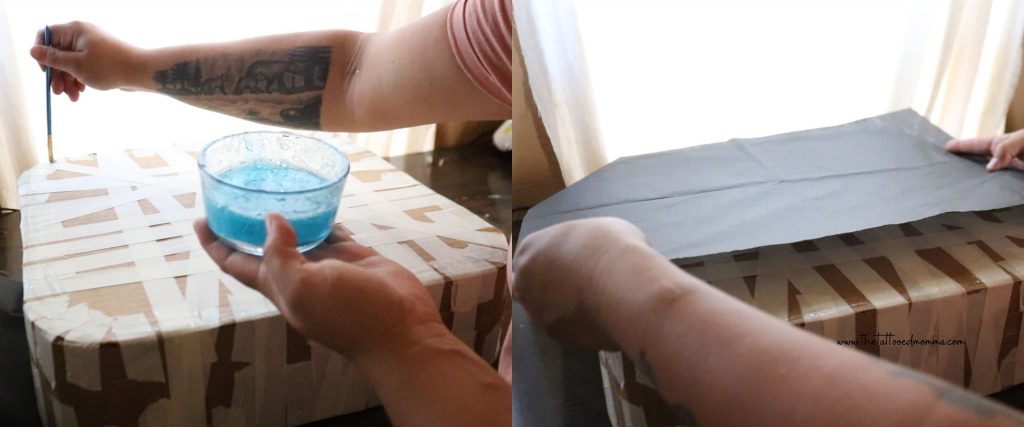
- glue mixture
- Mix together some school glue with water until it’s about as thin as pancake batter.
If you don’t have school glue, no worries, mix together some regular flour and water until it is as thin as pancake batter and boom, you have glue.

- base tissue paper
- Paint glue all along the edge of the piñata and ONLY the edges then place down the base tissue paper on top part of pinata.
- Trim excess tissue paper
- Repeat these steps for bottom side of piñata.
If you put glue in the middle then it will make creases in the final product.
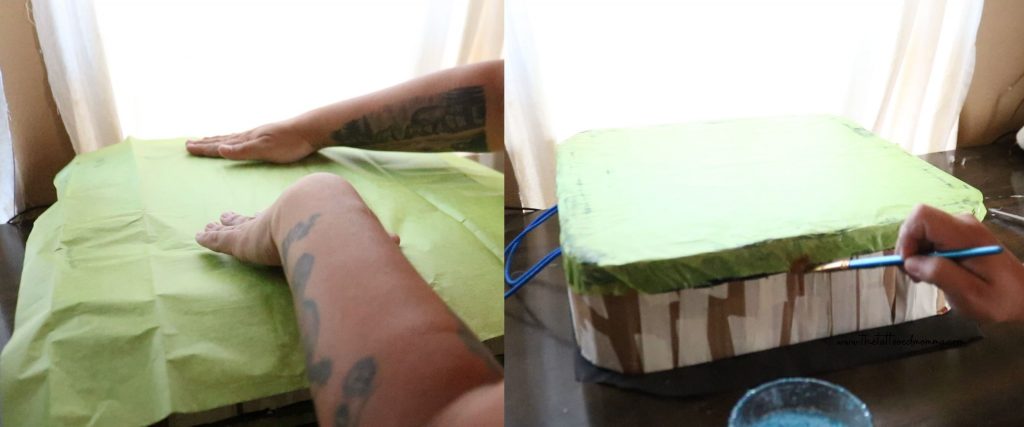
- lime green tissue paper
- add lime green tissue paper to both sides, again making sure to keep the glue only on the edges as much as possible.
- Then glue down the excess tissue paper to clean up the edges.
- dark green cardstock
- cut 6 strips in the shape of a crescent moon (these are the outer stripes).
- then cut 1 strip that is curved on both sides (this is the middle watermelon stripe).
- next, cut the 2 middle crescent moons in half
- place the watermelon stripes where you feel they look best then glue them down.

- pink square
- cut pink tissue paper into 3″ wide strips, keeping the length as long as possible. Fold that in half then, on the folded side, start cutting little slices across an entire strip. Only cut about 3/4’s of the way up and try doing multiple pieces at once to save time.
- round off the edges of a full sheet of pink cardstock. Glue the pre cut pink tissue paper fringe directly to the pink cardstock, starting at the bottom and working your way up – 1 line at a time.
- When you are finished, trim off all the excess tissue paper with scissors.

- TV border
- cut out your tv border piece. Use the pink fringed cardstock to measure how big your trim piece needs to be.
- glue the pink fringed cardstock to the pinata then glue the white tv border piece on top of that.

- face and accessories
- black cardstock: draw and cut 2 egg shapes for the eyes, a nose, and a mouth.
- white cardstock: draw and cut out the tv glare then draw and cut 2 tiny specs to place on top of the black egg shaped eyes. glue the white specs to the black egg shaped eyes.
- pink cardstock: draw and cut a large half circle for the antennae base. Then trace a quarter 2 times and cut that out.
- fold a purple cleaner with one side being longer than the other then hot glue a blue pom pom to each end. (you can substitute this step with purple and light blue cardstock.
- web search “cocomelon lady bug”, print it out on white cardstock, then cut it out.
- glue all the above pieces onto the pinata.

- the sides
- cut 4″ wide strips of green tissue paper then glue them all the way around the sides.
- when you get to the side with the rope, fold the tissue paper in half and cut a slit to pull the rope through
if the raw parts of the pinata are showing through then use 2 layers of tissue paper

Click Here to be taken to “How to MAKE a Cocomelon Pinata”.
How To Decorate A Cocomelon Pinata
Step by step instructions to decorate a beautiful Cocomelon pinata.
Materials
- school glue
- lime green, dark green, and pink tissue paper
- 2 purple pipe cleaners (or purple cardstock)
- 2 small sky blue pom poms (or sky blue cardstock)
- cardstock: black, white, pink, and dark green
Tools
- scissors
- glue gun
- pencil
Instructions
glue mixture - mix together school glue with
water until it’s about as thin as pancake batter.
glue down base tissue paper - Place
glue all along the edge of the piñata and ONLY the edges. Place down the base tissue paper. Trim off
excess tissue paper. Repeat these steps for the bottom side.
lime green tissuepaper - add some lime green tissue paper to both sides, again making sure
to keep the glue only on the edges as much as possible. Use 2 layers for a deeper
green color.
glue down excess tissue paper– glue down any tissue paper that is hanging off the sides.
pink fringe – cut pink tissue paper into 3” wide strips, keeping the length as long as possible. Then fold that in half and start cutting little slices across an entire strip, on the folded edge side. only cut about ¾’sof the way up.
pink cardstock – roundoff the edges of a full sheet of pink cardstock. Glue your pre cut pink tissue paper fringe directly to the pink cardstock starting at the bottom and working your way up, 1 line at a time. (see video or blog post for visuals). When finished, trim off all excess tissue paper with scissors.
dark green cardstock – cut out 7 watermelon stripes. You’ll need 2 pieces of cardstock for this step. Place the 2 longest stripes on the outer edge. Then place the next longest stripes in between those and so on until you have the 7 stripes on your pinata.
white cardstock – cut out your border piece. (This will go around the edge of the pink cardstock with fringe). Use the pink fringed cardstock to measure how big your trim piece needs to be.
glue pink cardstock – put glue all over the back of fringed pink cardstock and glue it to the center.
white cardstock border – glue the white border piece onto the pink fringed cardstock.
eyes, nose, mouth – using the black cardstock draw and cut 2 egg shapes for the eyes, the nose, and mouth.
tv glare and white specs on eyes – using white cardstock draw and cut the tv glare. Then draw and cut 2 tiny specs to place on top of the black egg shaped eyes.
glue white specs – glue 1 spec on each black eye
antennae base and rosy cheeks – draw and cut a large half circle for the antennae base. Trace a quarter 2x onto pink cardstock then cut them out.
antennae – fold a piece of pipe cleaner with one side being longer than the other and hot glue a blue pom pom on each end. (you can use purple and light blue cardstock for this step as a substitute).
lady bug – web search “cocomelon lady bug”, print it out on white cardstock, and cut it out.
glue all embellishment pieces on – glue all the pieces on the pinata.
the sides – cut 4” wide strips of green tissue paper and glue them all the way around the sides. Use 2 layers if the raw parts of the pinata are showing through. When you get to the side with the rope, fold the tissue paper in half and cut a slit to pull the rope through.
How to MAKE a cocomelon pinata is linked at the bottom of this blog post.
Click the video to see 3 other ways to decorate a pinata.


 How To Make A Cocomelon Pinata
Leave a Reply