Easy Homemade Avocado Oil Mayonnaise Recipe
Once you see how easy this homemade mayonnaise recipe is to do at home, you won’t ever want the store bought stuff again.

1 Minute Homemade Mayonnaise Recipe
Mayonnaise is one of those things we don’t really think about making ourselves which is crazy because it literally takes about a minute to do. I find myself making this recipe about once a week since it’s that simple and I can bet you already have all the ingredients in your kitchen right now.
Why you should make this homemade mayonnaise recipe
If you look at what the store bought mayo is made of you’ll see they have some pretty poor ingredients. In fact, the number one ingredient in most store-bought mayonnaise is soybean oil and in case you thought soybean oil was healthy, here’s a reality check – it’s NOT!
New research from UC Riverside shows that “soybean oil not only leads to obesity and diabetes, but could also affect neurological conditions like autism, Alzheimer’s disease, anxiety, and depression.” – source
This post contains affiliate links, which means I make a small commission at no extra cost to you but I only recommend products that I actually use and love. Read the full disclosure here.
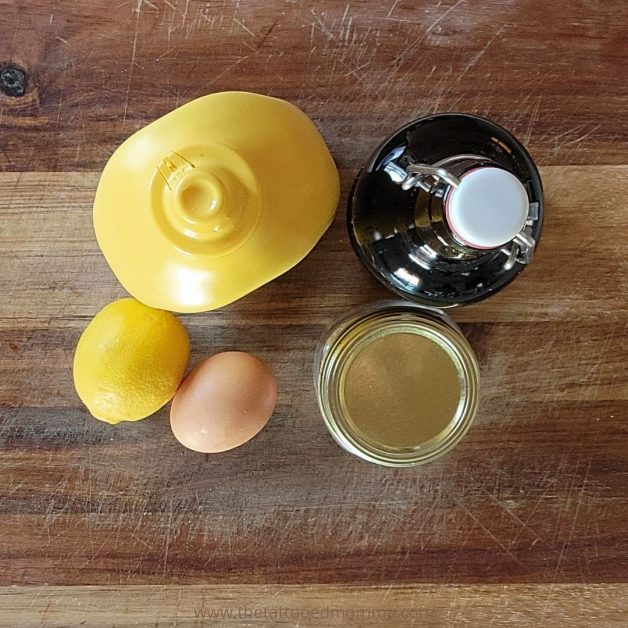
Homemade Mayonnaise Recipe Ingredients
Avocado Oil – I like using avocado oil because it has a light flavor so you won’t be overwhelmed by the difference in taste compared to the store bought mayo you might be used to. If you don’t have avocado oil then you can use grapeseed, safflower, or olive oil instead.
But olive oil can have a strong and overpowering taste than what most people would prefer. So if it’s you’re first time making homemade mayonnaise I would recommend one of the other listed oils I’ve mentioned or at least starting off by mixing half olive oil and half one of the other oils together.
Mustard – The true way to make mayo is with Dijon Mustard but I rarely have that on hand so most of the time I just use the regular.
If you aren’t a fan of mustard ,don’t worry because you wont taste it in the final product but mustard is needed to keep the mayo mix from breaking because….well because Science. It is possible to make this without the mustard but it’s one of the ingredients that makes this recipe fail proof.
Later on down the road if you feel you’ve mastered this recipe then try it without the mustard if you still aren’t diggin’ it.
keep scrolling for homemade mayonnaise recipe
Lemon Juice – if you don’t have lemons on hand you can substitute with lime or white wine vinegar.
Salt – Recently I learned the salt is what makes the mayonnaise thick so don’t skip this part. I use Pink Himalayan salt but any salt will do.
Egg – Although most recipes use the egg yolk only, in this recipe we’re using the entire raw egg because it comes out the same anyway. It also saves time from having to separate the egg because “ain’t nobody got time for that” plus there’s no egg waste. (but if we’re being real here, if you were to use only the egg yolk then it would might as well be called Aioli)
How to Make this Homemade Mayonnaise Recipe
The steps I’m about to show you are EXACTLY the way EYE (I) make mayonnaise and it has ALWAYS worked. This is important to note because I’ve had a lot of people thank me for this recipe but at the same time a lot of people really mad at me for “doing it wrong”. check out the hilarious comments on my mayonnaise Tik Tok video here.
Pour the Oil. Pour 1 cup of oil into your mason jar.
Add mustard, lemon juice, and salt.
Raw Egg. Add the whole raw egg (minus the shell – come on now).
Immersion Blender. Place the immersion blender all the way to the bottom of the jar, making sure to cover the egg. Begin blending and slowly pulling the immersion blender up as each part below it turns white. You are done once all the oil has become mayonnaise and there is no visible oil left.
Frequently Asked Questions
When I originally uploaded this homemade mayo video to Tik Tik, I didn’t expect it to take off. But it became viral instantly and the questions FLEW IN!
Why did my mayonnaise turn yellowish? It can look a yellowish if you added a little too much mustard. If I’m being true to my recipe then you should add 1 teaspoon mustard but I usually just give the bottle a small squeeze to save on time and dishes.
What is the fridge life? The longest I’ve kept this homemade mayonnaise in the fridge for has been 3-4 days because I make it as I need it but one google source says “if you ferment the mayonnaise for 6 hours, it will keep for 2 months in the refrigerator”. Here is the source for that and she even shows you how to ferment it.
“aren’t you worried about salmonella poisoning?”
Aren’t you worried about getting salmonella poisoning from using raw eggs? Yes! – If I didn’t trust my source then that would be a big concern but since I get my farm fresh eggs from my own chickens, I know I keep a tip top coop and very healthy chickens.
Why would you use the whole egg when you’re supposed to only use the yolk? Because I do what I want Karen but also because one day I forgot to separate the egg yolk and decided to just go with it since I wasn’t about to dig it back out. And you know what happened? It still became mayonnaise and I lived happily ever after because I saved time and didn’t waste an egg white 🙂
Why aren’t you drizzling the oil? That is the correct way to do it. All I have to say to this “question” is that the way I did it made mayonnaise just like I wanted it to. Also that 6+3=9 and so does 5+4; there isn’t a single right way to do something.
There is no “one size fits all” when it comes to how you cook
Do I have to use avocado oil? No, you can substitute the avocado oil for grapeseed, safflower, or olive oil but olive oil can have a strong and overpowering taste than what most people would prefer. I haven’t tried coconut oil yet but I have seen it done so that’s a fun option too!
What brand is your immersion blender and what kind of attachment are you using for it? It’s a basic Kitchen Aid one that I purchased at Walmart a couple years ago. Here is the link to it. As for the attachment, I’m just using the same attachment that came with the machine.
Do I have to use the whole egg? No, you can use 1 whole egg or just 1 yolk or even just 1 egg white for this recipe.
Homemade Mayonnaise Recipe
Instructions:
Add the oil, mustard, lemon juice, salt, and raw egg to a tall jar.
Place the immersion blender at the bottom of the jar, making sure to cover the egg. Start blending and pulling up as the oil turns white.
Tools:
Ingredients:
- 1 cup oil
- 1 tspn mustard (dijon or regular)
- 2 tspn lemon juice (substitute with lime juice or white wine vinegar)
- 1 tspn salt
- 1 whole raw egg
Directions:
- Add all the ingredients to the jar (order doesn’t matter)
- If the mustard, salt, egg, and lemon juice haven’t settle to the bottom of the jar then push them to the bottom with your immersion blender.
- Place your immersion blender at the bottom of the jar, making sure to cover the egg. Start blending and begin pulling up slowly as the oil beneath the blender blade turns white.
- You are done once all the oil has turned to mayonnaise and there is no visible oil left.
Notes:
Keep mayonnaise in an air tight container and store in fridge. Your mayonnaise won’t look pearly white because of the mustard in this recipe.
Easy Homemade Avocado Oil Mayonnaise

Delicious homemade mayonnaise in less than 1 minute. Once you see how easy this mayo is to do at home, you won't ever want the store bought stuff again.
Ingredients
- 1 cup oil
- 1 tspn mustard (dijon or regular)
- 2 tspn lemon juice (substitute with lime juice or white wine vinegar)
- 1 tspn salt
- 1 whole raw egg
Instructions
• Add all the ingredients to the jar (order doesn't matter)
• If the mustard, salt, egg, and lemon juice haven't settle to the bottom of the jar then push them to the bottom with your immersion blender.
• Place your immersion blender at the bottom of the jar, making sure to cover the egg. Start blending and begin pulling up slowly as the oil beneath the blender blade turns white.
• You are done once all the oil has turned to mayonnaise and there is no visible oil left.
Notes
Keep mayonnaise in an air tight container and store in fridge. Your mayonnaise won't look pearly white because of the mustard in this recipe.
Nutrition Information:
Yield:
16Serving Size:
1 tablespoonAmount Per Serving: Calories: 126Total Fat: 14gSaturated Fat: 1gCholesterol: 12mg
Let’s Connect!
Pin It!